Integrating tracker into the VOT toolkit (multi-channel support)
Prerequisites
This tutorial assumes that you already have the toolkit on your computer:
The toolkit and TraX are downloaded from github repository (master).
TraX protocol has to be compiled manually using cmake and C++ compiler.
Be careful that TraX is compiled using the same architecture (32 or 64 bit) as your tracker and Matlab are using. In the configuration.m set the following command:
set_global_variable('trax_source', '<path-to-trax-folder>');Be sure that you have added a path to the compiled trax bin folder into the system path.
It is important that you compile TraX and set trax_source variable before next steps described in this tutorial.
Integrating the tracker
At the workspace set up process (more information about the process are available here) select the experiment stack vot2019_rgbd_test. After the set up has been successful the following steps are needed:
A template file for your tracker, which was generated by the workspace set up process, has to be manually edited.
Open the tracker configuration file vot-workspace/tracker_{{name}}.m, where {{name}} is the unique identifier of your tracker:
- Remove line:
error('Tracker not configured!'); - Optionally, set
tracker_label = [];totracker_label = '{{name}}';, where{{name}}is a non-unique human-readable name of the tracker. - Set the
tracker_commandvariable to the absolute path to your tracker executable and the optional parameters as explained further down. In case of Python tracker the tracker_command should have (besides path to the directory where the script of the tracker is) also path to the support/python directory which is in trax directory. - If you are using an interpreter to run your tracker (e.g. Matlab or Python) verify that
tracker_interpretervariable is set to the correct value. - Set variable
tracker_linkpathif the tracker needs some additional libraries which are not in standard library path. In case of C/C++ or Python tracker the tracker_linkpath variable has to contain path to the TraX lib and bin directories (they are generated at TraX compiling process).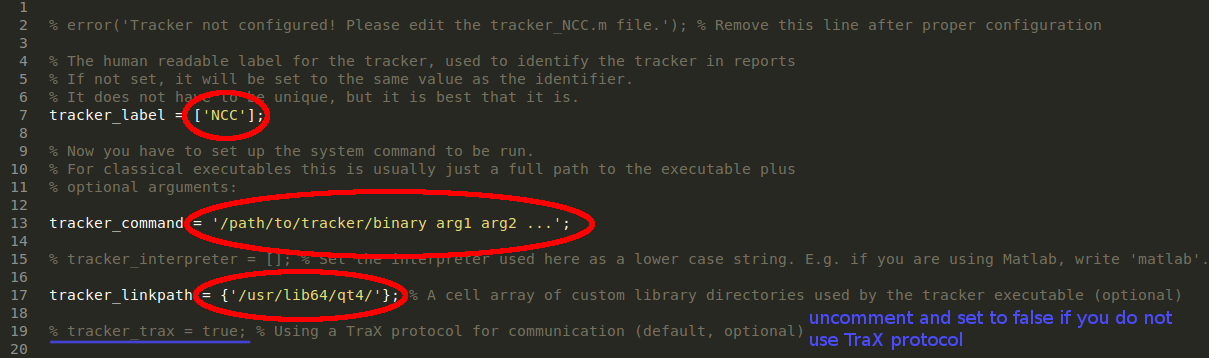
Also, verify that ./vot-workspace/run_experiments.m line tracker = tracker_load('{{tracker}}') is set that {{tracker}} is the unique identifier of your tracker. (e.g. tracker = tracker_load('NCC')). This is important to do if you are running multiple trackers in the same workspace.

The best way to get familiar with integration of trackers into the VOT toolkit is by looking one of the examples that are provided in the /tracker/examples directory of the VOT toolkit. Also, look at the rest of this document for specifics on integration of trackers written in different languages.
We have prepared example tracker_Demo_{{language}}.m configuration files for all programming languages which are currently supported by the toolkit.
They can be found in the tracker/examples directory. In these files you can see how your vot-workspace/tracker_{{name}}.m should look like.
Native trackers
For native trackers, written in C or C++ the communcation between the toolkit and the tracker is handled by the code in the vot.h file that is available in the tracker/examples/native directory. Below is a simple example that illustrates how the communication is performed using this header file in C code.
// Uncomment line below if you want to use rectangles
// #define VOT_RECTANGLE
#include "vot.h"
int main( int argc, char** argv)
{
int f;
vot_region* region = vot_initialize(); // Initialize the communcation
const vot_image* image = vot_frame();
const char* imagefile = image->visible;
const char* depthfile = image->depth;
// TODO: Load the first frame and use the initialization region to initialize the tracker.
for(f = 1;; f++)
{
const vot_image* image = vot_frame();
if (!image) break;
const char* imagefile = image->visible;
const char* depthfile = image->depth;
// tracker can report the confidence of the predicted region
float confidence; // (optional)
// TODO: Perform a tracking step with the image, obtain new region
vot_report2(region, confidence); // Report the position of the tracker
}
vot_region_release(®ion); // In C regions have to be released to free memory.
vot_quit(); // Output the results and clear the resources
return 0;
}If the code is compiled as C++ the following simple example illustrates how the communication is performed using the same header file using classes.
// Uncomment line below if you want to use rectangles
// #define VOT_RECTANGLE

#define VOT_RGBD
#include "vot.h"

int main(int argc, char* argv[])
{

    VOT vot; // Initialize the communcation

    VOTRegion region = vot.region(); // Get region and first frame
    VOTImage image = vot.frame();
    string pathRGB = image.visible;
    string pathD = vot.depth;

    // TODO: Load the first frame and use the initialization region to initialize the tracker.

    //track
    while (true) {
        image = vot.frame(); // Get the next frame
        pathRGB = image.visible;
        pathD = image.depth;
        if (pathRGB.empty()) break; // Are we done?

        // tracker can report the confidence of the predicted region
        float confidence;  // (optional)

        // TODO: Perform a tracking step with the image, obtain new region

        vot.report(region, confidence); // Report the position of the tracker
    }

    // Finishing the communication is completed automatically with the destruction
    // of the communication object (if you are using pointers you have to explicitly
    // delete the object).

    return 0;
}
To register a native tracker in the environment, simply set the tracker_command variable value in the tracker configuration file to the full absolute path to the executable (optionally together with required parameters if the tracker requires some).
TraX library: The wrapper header overlays the TraX library to communicate with the toolkit. Because of this you have to download and enable the TraX library (precompiled releases are available for major platforms on BinTray).
Linking problems: In some cases the executable requires access to some additional libraries, found in non-standard directories. Matlab overrides the default linking path environmental variable, which can cause linking problems in some cases. For this we have introduced a tracker_linkpath variable. This variable should be a cell-array of all directories that should be included in the linking path. An example below adds two custom directories to the library path list in Linux:
tracker_linkpath = {'/usr/lib64/qt4/', '/usr/lib64/opencv/'};Matlab trackers
Matlab-based trackers are a bit more tricky to integrate as the scripts are typically run in an integrated development environment. In order to integrate a Matlab tracker into the evaluation, a wrapper function has to be created.
The communcation between the toolkit and the tracker is handled by the code in vot.m file that is available in the tracker/examples/matlab directory. It is best to copy this file to your tracker directory. The function vot accepts a string parameter that should contain either value 'rectangle' or 'polygon' depending on which region format does your tracker expect (formats will be automatically converted, however, you may want to do it manually to avoid any problems and to get the most information from the input data). Below is a simple example that illustrates how the communication is performed.
function your_tracker

    RandStream.setGlobalStream(RandStream('mt19937ar', 'Seed', sum(clock))); % Set random seed to a different value every time as required by the VOT rules.

    [handle, image, region] = vot('rectangle', 'rgbd'); % Obtain communication object

    image_rgb = imread(image{1}); % Read first (RGB) image from file
    image_depth = imread(image{2}); % Read first (Depth) image from file
    % TODO: Initialize the tracker with first image and the given initialization region

    while true

        [handle, image] = handle.frame(handle); % Get the next frame

        if isempty(image) % Are we done?
            break;
        end;

        image_rgb = imread(image{1}); % Read the image (RGB) from file
        image_depth = imread(image{2}); % Read the image (Depth) from file
        % TODO: Perform a tracking step with the image, obtain new region

        % Report position and confidence (optionally) for the given frame
        handle = handle.report(handle, region, confidence);

    end;

    handle.quit(handle); % Output the results and clear the resources

end
For an concrete example of integration please check out the Matlab tracker example in the tracker/examples/matlab directory.
When specifying the tracker_command variable in the tracker configuration file please note that the wrapper script file is not the one being executed but functions only as a parameter to the Matlab executable. For convinience, the toolkit provides a function that generates a valid tracker_command string for Matlab trackers by specifying the script that should be run and the directories that should be included before that.
tracker_command = generate_matlab_command('<TODO: tracker script>', {'<TODO: path to script>'});It is important that all the directories containing required Matlab scripts are contained in the MATLAB path when the evaluation is run. Also note that any unhandled exception thrown in the script will result in Matlab breaking to interactive mode and that this will prevent the evaluation from continuing. It is therefore advised that all exceptions are handled explicitly so that the wrapper script always terminates the interpreter.
TraX mex: The wrapper header overlays the TraX library to communicate with the toolkit. If you have downloaded the toolkit with pre-compiled MEX files it should already include the required components, otherwise the toolkit will compile them (you need a C/C++ compiler to do that).
Python trackers
For trackers, written in Python the communcation between the toolkit and the tracker is handled by the code in the vot.py file that is available in the tracker/examples/python directory. Below is a simple example that illustrates how the communication is performed using this header file in Python code:
#!/usr/bin/python
import vot
import sys
import time

handle = vot.VOT("rectangle", "rgbd")
selection = handle.region()

# Get paths of color and depth images
colorimage, depthimage = handle.frame()
if not imagefile:
    sys.exit(0)

# TODO: Read both images and initialize tracker

while True:
    imagefile = handle.frame()
    if not imagefile:
        break

    # Get paths of color and depth images
    colorimage, depthimage = handle.frame()

    # TODO: Read both images and track the object

    handle.report(selection, confidence)
    time.sleep(0.01)
When specifying the tracker_command variable in the tracker configuration file please note that the wrapper script file is not the one being executed but functions only as a parameter to the Python interpreter executable. For convinience, the toolkit provides a function that generates a valid tracker_command string for Python trackers by locating the interpreter executable and specifying the script that should be run and the directories that should be included before that.
tracker_command = generate_python_command('<TODO: tracker script>', {'<TODO: path to script>'});It is important that all the directories containing required modules are contained in the Python path or provided to the generator command.
TraX package: The wrapper class for Python overlays the TraX library to communicate with the toolkit. You can get the Python implementation of the TraX protocol in the reference implementation repository, but by default the toolkit should also download it when it is initialized (check if native/trax directory exists).
Testing integration
It is not recommended to immediately run the entire evaluation without testing the integration on a simpler task. For this the toolkit provides the run_test function that provides an interactive environment for testing your tracker on various sequences.
Using this environment you can verify the correct interpretation of input and output data (at the moment the interactive visualization only works in Matlab) as well as estimate the entire evaluation time based on several runs of the tracker on various sequences (run the tracker on several sequences, then select the option to display required estimate).
Integration rules
To make the tracker evaluation fair we list several rules that you should be aware of:
Stochastic processes - Many trackers use pseudo-random sampling at certain parts of the algorithm. To properly evaluate such trackers the random seed should not be fixed to a certain value. The best way to ensure this is to initialize seed with a different value every time, for example using current time. In C this is done by calling
srandom(time(NULL))at the beginning of the program, while one way of doing this in Matlab is by calling:RandStream.setGlobalStream(RandStream('mt19937ar', 'Seed', sum(clock)));Image stream - The tracking scenario specifies input images as a stream. Therefore the tracker should always only access images in the specified order and not skip ahead.
Tracker parameters - The tracker is supposed to be executed with the same set of parameters on all the sequences. Any effort to determine the parameter values that were pre-tuned to a specific challenge sequence from the given images is prohibited.
Resources access - The tracker program should only access the files in the directory that it is executed in.
Tracking confidence - A tracker can report the confidence of predicted region. The number can be on an arbitrary range where high value represents high confidence and vice versa. In the long-term tracking challenge reporting of a confidence score is required, while it is optional for the main challenge.
While we cannot enforce these guidelines in the current toolkit, the adherence of these rules is mandatory. Any violation is considered as cheating and could result in disqualification from the challenge.